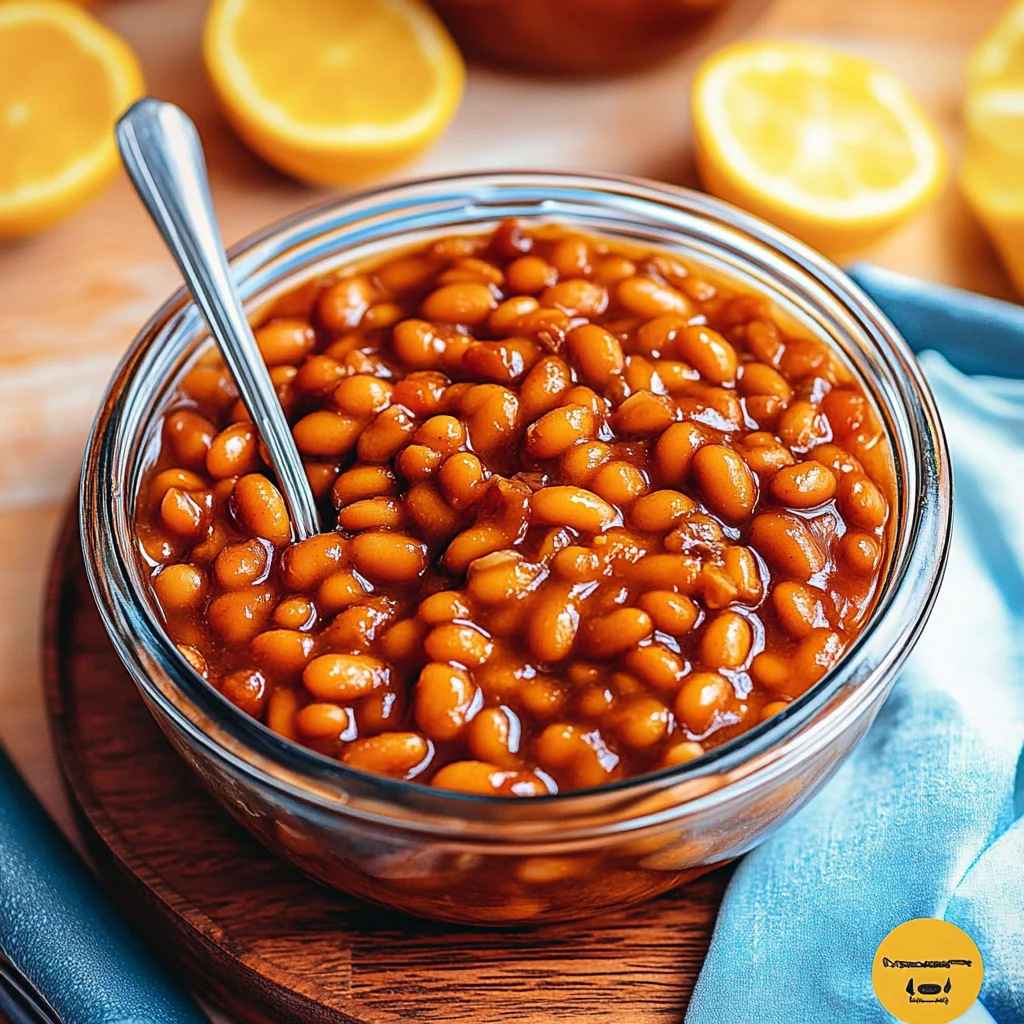
Imagine the comforting aroma of homemade baked beans wafting through your kitchen, filling the air with warmth and nostalgia. The rich, smoky essence from bacon melds beautifully with the sweet and tangy sauce, creating a dish that’s both hearty and satisfying.
This recipe is not only easy to follow but also rewards you with a deliciously fulfilling meal that feels like a hug in a bowl. Perfect for gatherings or cozy family dinners, it’s a classic that will make everyone come back for seconds. As you embark on this culinary journey, let’s dive into how to create these delightful beans.
Quick Overview
Homemade baked beans are a comforting dish featuring tender navy beans simmered in a rich, sweet, and tangy sauce. The addition of crispy bacon and aromatic onions elevates the flavor profile, making it perfect for barbecues, potlucks, or as a hearty side dish. Enjoy them warm for an inviting meal experience.
Now that you have the overview, let’s dive into the specific steps for creating this delicious recipe.
Why This Recipe Works
- This homemade baked beans recipe strikes the perfect balance between sweet and savory flavors, creating a comforting dish.
- The combination of bacon and aromatic vegetables enhances the beans’ natural richness, ensuring every bite is satisfying.
- Slow baking allows the sauce to develop deep, complex flavors while keeping the beans tender and creamy.
- This reliable recipe is perfect for gatherings or cozy family dinners, making it a staple in any kitchen.
As you prepare your homemade baked beans, consider the many variations and twists you can add to personalize this dish.
Essential Ingredients
To create the perfect homemade baked beans, quality ingredients are key for rich flavor and texture.
- 1 cup dried navy beans: Soak overnight in water to ensure they cook evenly and become tender.
- 4 slices bacon: Choose a good-quality bacon for maximum flavor; chop it into small pieces for even cooking.
- 1 medium onion: Finely dice the onion to enhance the overall taste and aroma of the dish.
- 2 cloves garlic: Minced garlic adds a fragrant depth; use fresh garlic for optimal flavor.
- 1 cup ketchup: Opt for low-sugar ketchup to balance sweetness with tanginess in the sauce.
- 1/4 cup brown sugar: Use packed brown sugar for a rich, caramel-like sweetness that complements the beans.
- 1 tablespoon apple cider vinegar: This adds acidity and brightness, balancing the richness of the bacon and beans.
- 1 tablespoon Worcestershire sauce: A hint of umami from Worcestershire sauce deepens the flavor profile of your dish.
- 1 teaspoon mustard powder: Adds a subtle bite; consider using Dijon mustard for a more complex flavor.
- 1/2 teaspoon smoked paprika: This ingredient brings a smoky essence that elevates traditional baked beans to another level.
- 1/2 teaspoon black pepper: Freshly ground black pepper enhances flavors without overpowering the dish.
- 1 teaspoon salt: Adjust salt to taste, keeping in mind that bacon and broth may add additional saltiness.
- 2 cups water or vegetable broth: Using vegetable broth instead of water adds extra depth and richness to your baked beans.
The full ingredients list, including measurements, is provided in the recipe card directly below.
How to Make homemade baked beans
Step 1: Prepare the Beans:Drain the soaked navy beans and rinse them under cold water. This step removes impurities, ensuring your beans have a clean taste and texture.
Step 2: Cook the Bacon and Aromatics:In a large pot over medium heat, cook the chopped bacon until crispy, about 5-7 minutes. The sizzling sound and savory aroma will fill your kitchen, enhancing flavor.
Step 3: Combine Ingredients:Add the diced onion and cook for another 3-4 minutes until softened. Stir in garlic for an additional minute, releasing its fragrant essence before adding the soaked beans and sauce ingredients.
Step 4: Bake the Beans:Transfer everything to an oven-safe dish, cover with foil, and bake at 300°F (150°C) for 3-4 hours. The smell of slowly simmering flavors will envelop your home as the beans become tender.
Step 5: Final Touches:Remove the foil for the last 30 minutes to allow the top to caramelize slightly. This step creates a delicious contrast between creamy beans and a rich, sticky sauce.
Enjoy these comforting baked beans warm as a delightful side dish or main course, perfect for gatherings or cozy dinners! Now let’s explore some serving suggestions to elevate your meal.
Common Mistakes to Avoid
- One common mistake when making homemade baked beans is not soaking the navy beans long enough, which can lead to uneven cooking.
- Many people also forget to stir the mixture occasionally while baking, resulting in beans that may burn or dry out on top.
- Another frequent error is using too much liquid at the start, which can prevent the sauce from thickening properly as it bakes.
To ensure your homemade baked beans turn out perfectly, let’s delve into some serving suggestions that will complement this hearty dish beautifully.
Pro Tips for Best Results
1. Soak your beans overnight to ensure even cooking; this reduces baking time and enhances the texture of your homemade baked beans.
2. Adjust the sweetness by experimenting with the brown sugar; start with less if you prefer a less sweet flavor profile in your beans.
3. Keep an eye on moisture levels while baking; adding extra water or broth as needed prevents the beans from drying out and ensures a rich sauce.
With these tips, you’ll elevate your homemade baked beans to a new level of deliciousness, making them a standout dish at any gathering.
Make It Your Way
- When crafting your homemade baked beans, feel free to swap navy beans for other varieties like pinto or black beans for a different flavor profile.
- Want to kick up the spice?
- Consider adding diced jalapeños or a dash of cayenne pepper to the mix.
- For a vegetarian option, simply omit the bacon and use olive oil to sauté the onions and garlic, while enhancing the flavor with smoked liquid aminos or coconut aminos.
- Your creativity can truly shine in this dish, so explore and make it your own!
What to Serve With It

Homemade baked beans pair wonderfully with cornbread for a comforting meal. You can also serve them alongside grilled sausages or burgers for a classic backyard barbecue vibe. For drinks, consider a chilled lemonade or a light lager to complement the rich flavors of the beans. Enjoy!
To further enhance your homemade baked beans experience, let’s explore some variations to customize this dish.
Make-Ahead & Meal Prep
Homemade baked beans can be prepared a day in advance, allowing the flavors to meld beautifully. Simply follow the recipe, then store them in an airtight container in the refrigerator. Avoid overcooking, as they may become mushy when reheated. Enjoy them warm for a comforting meal!
Now that you have a plan for making this dish ahead of time, let’s explore some delicious serving suggestions.
Storing & Reheating
To store your homemade baked beans, let them cool completely before transferring to an airtight container. They can be refrigerated for up to 5 days or frozen for up to 3 months. When reheating, warm gently on the stovetop, adding a splash of water if needed to maintain moisture and texture.
These delicious baked beans are perfect as leftovers, especially when served alongside your favorite dishes!
Troubleshooting & Fixes
If your homemade baked beans turn out too dry, it may be due to insufficient liquid; simply add a splash of water or broth during baking. If the beans are still tough after 4 hours, they likely needed more soaking time—next time, soak them longer or cook them on the stovetop briefly before baking.
Now that you have the solutions, let’s explore some delicious serving ideas for your homemade baked beans.
FAQ
What beans are best for homemade baked beans?
Dried navy beans are ideal for homemade baked beans due to their creamy texture when cooked.
Can I make homemade baked beans in advance?
Yes, you can prepare homemade baked beans a day ahead and reheat them before serving.
How do I store leftover homemade baked beans?
Store leftover homemade baked beans in an airtight container in the refrigerator for up to five days.
These frequently asked questions should help clarify any uncertainties, ensuring your baking experience is seamless.