Imagine the sweet aroma of ripe pears simmering gently on the stove, filling your kitchen with warmth as you make pear preserves. The rich, golden mixture thickens beautifully, promising a delightful spread that captures the essence of fall in every jar.

This pear preserves recipe is not only straightforward but also incredibly satisfying, allowing you to preserve seasonal flavors effortlessly. With just a few ingredients and simple steps, you’ll create something truly special to enjoy throughout the year.
Quick Overview
Pear preserves are a delightful, sweet spread made from ripe pears, sugar, and a hint of spices. The resulting texture is smooth and thick, with a warm, fruity flavor that shines. Perfect for topping toast or adding to desserts, these preserves bring a taste of homemade goodness to any breakfast or snack time.
Now that you know what pear preserves are all about, let’s dive into the detailed recipe!
Why This Recipe Works
- This pear preserves recipe achieves a beautiful balance of sweetness and brightness, enhancing the natural flavors of ripe pears.
- The careful cooking technique ensures the preserves thicken perfectly, resulting in a delightful spreadable texture.
- Each jar captures the essence of fresh pears, making it a reliable choice for year-round enjoyment.
- The optional spices add depth without overpowering the fruit, creating a harmonious flavor profile that everyone will love.
As you dive into the preparation, you’ll find each step contributes to an incredibly rewarding final product.
Essential Ingredients
To create delicious pear preserves, gather the following essential ingredients for optimal flavor and texture.
- 4 cups peeled and diced pears: Use ripe pears for the best flavor and ensure they are diced into small pieces for even cooking.
- 2 cups granulated sugar: Adjust the amount based on the sweetness of your pears to achieve your desired taste.
- 1 tablespoon fresh lemon juice: This ingredient helps preserve the color of the preserves while adding a bright acidity that balances sweetness.
- 1 teaspoon ground cinnamon: Optional but recommended, cinnamon adds warmth and depth to your preserves.
- 1/4 teaspoon ground nutmeg: Another optional ingredient; it provides a delightful hint of spice that complements the pears.
- 1/4 cup water: Necessary for helping the pears cook down without sticking to the pot, ensuring smooth preserves.
The full ingredients list, including measurements, is provided in the recipe card directly below.
How to Make Pear Preserves
Prepare the Pears:Wash, peel, and core 4 cups of ripe pears, dicing them into 1/2 inch pieces. Place the diced pears in a large pot with 1/4 cup of water to prevent sticking.
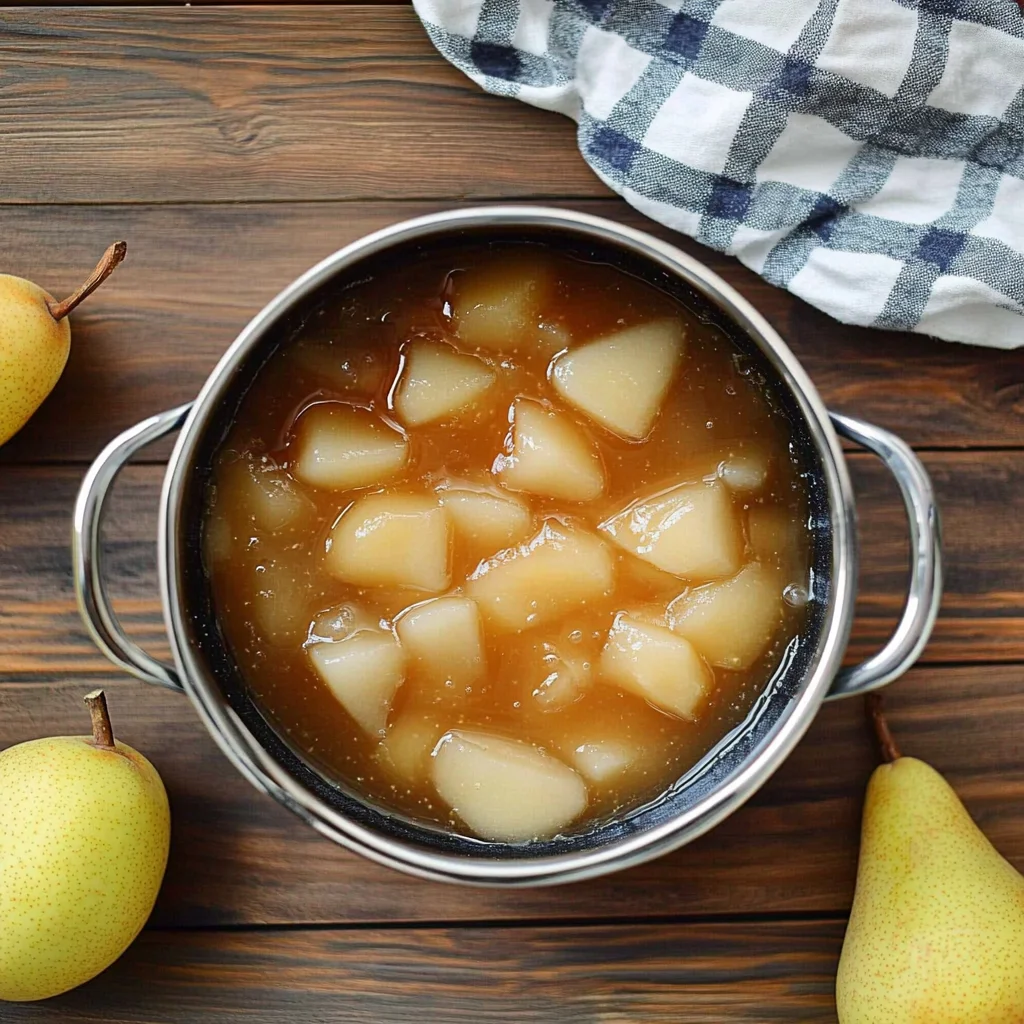
Cook the Pears:Over medium heat, bring the mixture to a gentle simmer, stirring occasionally. After about 10 minutes, the pears will soften; mash them to your desired consistency using a potato masher or food processor.
Add Sugar and Spices:Stir in 2 cups of granulated sugar, 1 tablespoon of fresh lemon juice, 1 teaspoon of ground cinnamon (if using), and 1/4 teaspoon of nutmeg. Mix until the sugar dissolves completely.
Cook Down the Mixture:Increase heat to medium-high and bring to a rolling boil for 30-40 minutes. Stir frequently; you’ll know it’s ready when a spoonful holds its shape beautifully.
Jar the Preserves:Remove from heat after thickening and let cool for about 5 minutes. Ladle the hot pear preserves into sterilized jars, leaving 1/4 inch headspace at the top before sealing with lids and rings.
These steps ensure that your pear preserves are perfectly sweetened and packed with flavor, ready for storage or enjoyment!
Common Mistakes to Avoid
- One common mistake when making pear preserves is not mashing the pears enough, resulting in a chunky texture rather than a smooth spread.
- Another issue is skipping the boiling water bath, which can lead to improper sealing and spoilage of your preserves.
- Lastly, adding too much or too little sugar can dramatically alter the sweetness and balance of flavors in your pear preserves.
To ensure your pear preserves are a delightful treat, let’s explore some tips for perfecting the process!
Pro Tips for Best Results
1. Choose ripe pears for your pear preserves; they yield the best flavor and sweetness, enhancing the overall taste of your preserves.
2. When mashing the pears, adjust the consistency to your preference; a chunkier preserve offers delightful texture, while a smooth blend is more spreadable.
3. Monitor the boiling time closely during cooking; overcooking can lead to overly thick preserves, while undercooking may result in a runny texture.
With these pro tips in hand, you’re ready to create delicious pear preserves that will elevate your breakfast spreads and desserts!
Make It Your Way
- While the classic pear preserves recipe is delightful on its own, you can easily customize it to suit your taste.
- Consider swapping in ripe peaches or apples for a delicious twist, or add a splash of vanilla extract for depth.
- If you’re looking for a sugar-free option, try using a suitable sweetener that matches your dietary needs without sacrificing flavor.
- Get creative with spices too—experiment with cardamom or ginger to elevate your pear preserves even further!
This flexibility in the recipe allows you to make it uniquely yours, enhancing the joy of preserving.
What to Serve With It
Pear preserves are delightful spread on warm toast or scones, paired with a dollop of cream cheese for extra richness. They also complement yogurt or oatmeal beautifully. For drinks, enjoy a cup of chamomile tea or a sparkling cider to enhance the sweet flavors of the preserves.
Now that you know how to serve these delicious pear preserves, let’s explore some creative ways to use them in recipes!
Make-Ahead & Meal Prep
Pear preserves can be prepared ahead of time and stored for up to one year when sealed properly. To improve flavor, consider making a larger batch and storing it in sterilized jars. Avoid adding any extra ingredients or spices not listed, as they may affect preservation.
Now that you have your pear preserves ready, let’s explore delicious ways to enjoy them!
Storing & Reheating
To ensure your pear preserves maintain their delicious flavor and texture, store sealed jars in a cool, dark place for up to one year. Once opened, refrigerate and consume within a month. For reheating, gently warm the preserves in a saucepan over low heat, stirring occasionally to preserve consistency. This will bring back the delightful taste of your homemade treat. Now that you have mastered storing and reheating, let’s explore some delightful ways to enjoy your pear preserves!
Troubleshooting & Fixes
If your pear preserves aren’t thickening, ensure you’ve boiled the mixture long enough (30-40 minutes). If they taste too sweet, adjust with a bit more lemon juice for balance. Lastly, if the jars don’t seal properly, check that the rims are clean before sealing and reprocess in a boiling water bath if necessary.
Now that you’ve tackled potential issues, let’s explore some delicious ways to enjoy your pear preserves!
FAQ
What type of pears are best for making pear preserves?
Ripe pears, such as Bartlett or Anjou, provide the best flavor for pear preserves.
How long can I store my homemade pear preserves?
Sealed jars of pear preserves can be stored for up to one year in a cool, dark place.
Can I adjust the sweetness of my pear preserves?
Yes, you can adjust the granulated sugar to taste depending on the sweetness of your pears.
With these frequently asked questions addressed, you’ll have all the confidence you need to create delicious pear preserves.